Minimize Your Debt

Hi Everyone! Hope you are doing good.

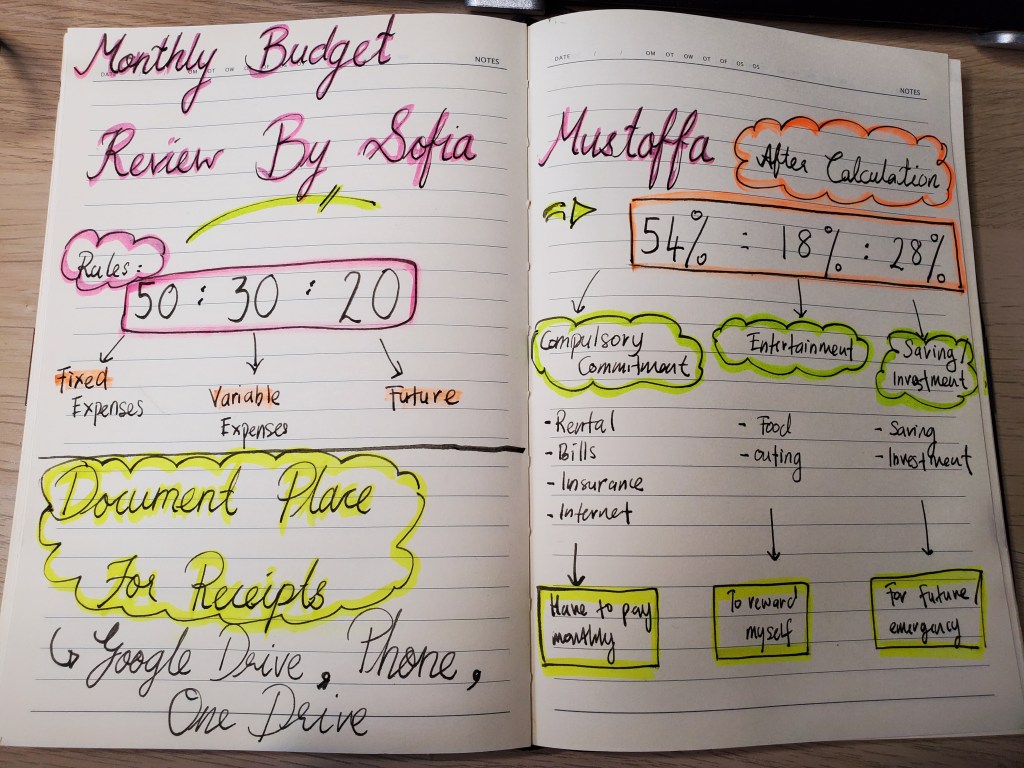
When talking about minimalism, it’s not only about your space. It’s about lifestyle, including your space, your financial goals, your relationship. It’s about how you let go of those unnecessary and keep the mandatory that always be your goal. It’s about setting up your life goals. Minimalist have various definitions towards each of people, but for me it’s lifestyle and life goals.

I’ve started being a minimalist since 2018, to be honest the most hardly to do is to minimalist my wardrobe and cables. I’ve decluttered my space, decluttered my relationship,Β  decluttered my circle friendship, minimizing my expenses and maximizing investment and saving. I really enjoyed the journey.

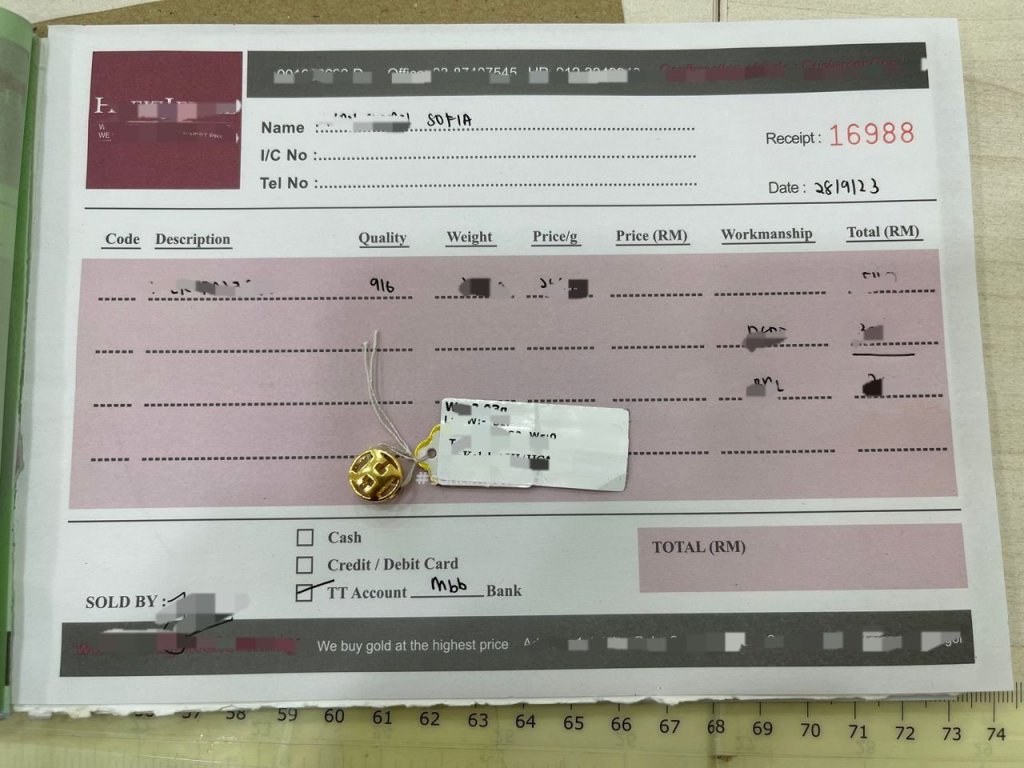
Today, I’m about to minimize my “bad debt” and transferring it to a good debt. The only “bad debt” I have now is my credit card which I’m fighting for quite so long. Today, I’m about to refinance my 1st home, and clearing all my credit card and have some cash in hand for me to build my positive cashflow – Debit Card.

Waiting in a line, my turn!! πŸ˜ƒ

There is a lot of impact and consequences I’ve  checked and put into consideration, like how much difference I need to bare, and what about insurance, how many years the new insurance will cover, is it enough until I’m at least by the age of 60/70? I’m not dare to take fewer years of insurance, so the original insurance was to cover 35 years, I’m checking for 30 years for the new insurance. Oh, by the way, the most important thing is the property has tenants and the cost can cover my whole bank now plus some little extra. By calculating everything, I saved monthly RM 1.2k!! Wee!!! Plus, my credit card settled and I have some cash in hand. So, I’m now need to think carefully what I shall do with the little money I have in hand.

Next, my target is to manage a debit card for replacing a credit card. Yay!! I was so happy as I’ve found the solution to declutter bad debt. After I’m done building positive cashf. Next, xt I’m gonna think a way on how to set goal for my retirement day!! Hey!! It’s not too earl to think about when you are nearly , okay? Nay or Yay!! πŸ˜ƒ

Till then see u in next post..

Love, Sofia

My New Addiction…916 Gold Starbucks Beads πŸ˜ƒ

Hi everyone and Salam Maulidur Rasul to all Muslims. How are you today? Hope you are well and blessed.

Just want to share one of my addiction now, which is a factor on how do I shift from negative cashflow to positive cashflow.

Previously, I’ve been so demotivated on workload etc of my surroundings. I try to find something that I love to do, which is valuable for future.

So, it happened from my sister and my mom influence on buying golds. The main support comes from my dearest person who always gimme moral supports and motivation to make gold collection.

I found adorable Pandora beads online, Starbucks 916 gold which is my fav one. πŸ₯°

I think I’m gonna start coffee and food collection since I love coffee and Im foodie… hahaha!! πŸ˜ƒπŸ˜‚

This month, I managed to buy 2 sizes starbuck beads- Venti & Grande. I’ve seen Coffee Grinder Gold Beads before, and I wanna find it for my next month budget. Just to add-on to my Coffee & Food collection. Other than those, I managed to buy necklace with Hermes Beads. Yeaahhh!!! ❀🌹πŸ”₯

Can’t wait for my next adventure…looking forward for more cute 916 gold Pandora beads for future..weee!!! πŸ₯°

Look how cute the box is!!! It’s original boxes when I bought it. So, presentable and lovely. ❀
Zoom in 🧐
My 2nd necklace..hehehe..I love to stack my necklace, bangle and bracelet with different designs. πŸ₯°
Yay!!! Managed to get it during Maulidur Rasul promotion today. Soo lovely ❀
Previously I got Hermes beads , 999. This time I bought 916. To be honest, favorable for me is 916, coz 999 is too soft and can bend easily.
Tadaaaa!!!!

Heheheehe..thats all for this month…lets see what we will have for next month. I hope I can find the coffee grinder ❀πŸ₯°β€

till then, to be continued…

Love, Sofia

Labeling Travel Toiletries and Pantry Items πŸ˜˜

HeLLoOooooOoo Everyone!!! It’s been awhile since my last post..How are you? Hope everyone is happy, sound and safe πŸ₯°

I recently trying to manage organizing my things in a proper manner, as I tried to customize my organizer according to my needs.

After decluttering so much, now I left myself with lot of organizer which organizer turn itself into clutters. Weee!!! πŸ˜€

some empty organizer that I’m still thinking what to do with it πŸ˜ƒ

I starts labelling my things, and to well organize my current things, such as my travel toiletries, and my pantry items like flour etc.

So, I bought empty black sticker and white permanent marker pen. I also have black tape as alternative way for labeling πŸ˜ƒ

Check this out…

I bought the sticker for RM 1 each sheet. I bought 2 sheets and the marker pen about RM 0.70 πŸ˜ƒ
I have black tape, so for my travel toiletries I’m using black tape and write it down with White Permanent marker pen. Well, IdK if the writing will fade or not, but its okay, lemme just try to use this as for now. Maybe I will need to find the one with waterproof for my toiletries πŸ˜ƒ

Okay, that’s all for now, till then..see u soon..

Love, Sofia

Revising My Monthly Budget for year 2023…πŸ₯³

Hello everyone!!! It’s been awhile I’m away from blog! Haha..so, here we go. Let’s start with financial planning for year 2023..hahaahaha..yes…for 2023!! Let’s plan for future! LOL

Okay, I’d checked on whatever resource I have, google, youtube…etc. So, I found the rules 50:30:20. It’s kinda interesting to check on. So, I made some calculation and hey yaa!!! I managed to get more savings! Yay!!! Way to go…minimalist lifestyle πŸ₯³πŸ₯³

Monthly Budget follow rules 50:30:20 …

For rules 50:30:20, this is the percentage that you need to allocate your monthly income. There are 3 categories, the 50% should be the Fixed Expenses that you will need to pay such as bills, rental, car, internet, tuition fee etc (compulsory to pay). For the 30% of your salary should go to Variable Expenses that you have options not to spend such as eating outside, movie, theme park, present, etc. The remaining 20% should go to your Future Plans such as emergency savings or any possible investment. Well, after the calculation, I had found out that my Fixed Expenses is 54% (slightly higher because I included insurance with investment under this category πŸ˜„), my Variable Expenses is 18% (I dont have much things to buy, just lil bit entertainment like movie/eating outside) and for Future plans I have 28% πŸ˜ƒ. I think this is good enough. As a minimalist, I always conscious on what to buy so that I don’t waste my money for clutters πŸ˜ƒ

Okay, how do I calculate all of these? Haha..im using a simple ratio calculation 😜

Let’s take example, income salary RM2000 and to follow rules 50:30:20 (%).

In this example, when you calculate all your bills (plus other compulsory to pay) and it total up for example RM 900. So, a simple ratio (900/2000) x 100 = 45%. So for those who has salary RM2000, how to calculate is to manage the Fixed Expenses below RM 1000, RM 600 for Variable Expenses and RM 400 for Future plans. πŸ˜ƒ

Where to store your monthly receipts for Tax Relief ?

Okay, I usually save in cloud, so easier to trace it. So, Im using Google Drive most of the times. Perhaps, you can have some other storage as well like One Drive. It is not really advisable to store in phone, as Phone can easily spoil then you will need to factory reset and all will be gone.

Okay, next I’m gonna explore how to diversify the savings and investments..till then..to be continue…

Love, Sofia

First step to build a healthy lifestyle β˜Ί

Good morning, everyone!!! πŸ˜ƒ

To build a healthy lifestyle needs courage, mental strength, and continuous discipline. It’s not easy, but when u starts, u can go with the flow. Each person has different kind of courage, try to understand yourself what u need the most. For me, all I need is a healthy food intake. It works for me to have beautiful and quality tableware to be used in daily routine πŸ₯°

My fav color for tableware. I just buy 1 complete set for myself. U don’t need much. Buy a beautiful and good quality one for urself, to gain ur interest in preparing ur dish. Make it a hobby to prepare ur dish, so that u will aware what kind of food to put onto the plate.

Well, for me sometimes, I don’t eat the prepared food straight coz of busy schedule. So, I do have separated container for my food πŸ₯°

Its stainless steel container with lid. U can used any kind that suit yourself, as long as its separated container. This because, we need to take into consideration of category food we took. Its recommended to have half fiber (quarter fruit, quarter vegie), quarter protein (chicken/beef/fish/lamb), and quarter carbs (rice/noodle/pasta/bread).
My container with lid

Okay, after I prepared my tableware, I need to get incharge and plan out my meals. Try to find some recipes that suit ur calorie intake. Im gonna try calorie counter apps, coz I dont need excess calories. Let’s starts!!!

I’m using LifeSum apps, to calculate necessary calories and gonna start on next Monday. So, there are 2 additional routine I’m gonna add-on, first is to trace my calorie intake, secondly is to add-in 30min exercise on my daily routine. If I can’t make it, I will reduce exercise time to 15min, as long as I can add-in exercise habits on my routine. ☺

I start with apps to count my calorie in and out. My body works this way. πŸ₯°

U can use any free apps. I just use the free apps and didn’t subscribe any apps. I wanna keep my commitment low, so I don’t waste any cents πŸ˜ƒ

Okay, till then…I will plan out my short term goal shortly to achieve by end of this year. Not much, but to ensure all achieve by end of this year 😘

Till then, to be continue…

Love, Sofia

Do it myself….Mahendi πŸ˜„

Hehe…hellooOooOooooOoooo…how are you?

Raya Aidilfitri is just around the corner. I bought these DIY mahendi online and thought wanna give it a try πŸ˜ƒ

Do you know how much it will cost for 1 hand mahendi in 2015? RM 15 (3.44 USD) per hand. Yes, that price was in 2015, I believe it will be more now, in 2022. Do you know how much I bought all of these kit? RM 31.50 (7.23USD) and you can use the sticker template over and over again, and wherever you want πŸ˜„

I bought 3 varieties of the finger design, 1 overall hand design and of course the henna (chose natural henna). You can choose your own fav design, coz sometimes when I did mahendi outside, they make a different design from what I chose. Myb they simply don’t know how to draw it. Idk😢

So…..here we gOoOoooo…let’s start….πŸ˜ƒπŸ₯°

How to DIY your own mahendi 😍

First thing first, you gotta choose which template you wanna try and where to put on your body πŸ˜…
I prepare some tissue, and cotton bud to apply henna on it. As you can see here, the packet is the original henna, where you need to mix it with water. But I want things easier πŸ˜ƒ, so I just bought readymade henna in the small cup. Of course it will be cheaper if you mix it yourself, i think the cup and packet, cup double price then the packet and a lot of quantity πŸ˜€
Okay, then you put on the sticker template on your hand like this. Don’t put henna on those..HH290..its the sticker code ya πŸ˜πŸ˜…
Alright, now we use the cotton bud to apply henna on top of the sticker…πŸ₯°
Tadaa…make sure all template is well stick and apply on all sticker holes…
……..something like this….see..i dont put the HH290 henna, if not u gotta see it on your hand too..please ensure you alert on those πŸ˜…πŸ˜…

Okay, after you apply the henna, you gotta wait for few hours…or some people will leave it overnight. But hey, Im not gonna wait that long, I just leave it for 30min πŸ˜‚. The more longer you wait, the more thick the color will be…☺

Okay, done for the hand part…let’s go to the finger part….

Hahaha…if you go to outside..most of them just lazy to design your hand. But me, I put on different design to my finger. You see, 3 different design on my fingers πŸ˜ƒ. Okay, you gotta put it lower like this, so that 1/3 of your finger will cover by the henna..
Apply the henna on top of the sticker template like this…
Tadaaa..you see, the color is not that bright coz I just leave it for 30min πŸ˜‚ okay, I waited another 30min. I don’t have much time to wait..LOL
Tadaaaaa….overall view..well..not bad…not bad at all
Its orange color. Henna got available in white, dark green, black, red…but I love orange color the most. Suit with my skin πŸ₯°
Jeng jeng….i just love it…different kind of design….πŸ₯°πŸ₯°πŸ₯°

Okay guys, thats all Im sharing on how to make your own mahendi. Your own design, your own satisfaction. Till then guys…to be continue….

Love, Sofia

My ‘me time’ – fast furious diy basket’s lid πŸ˜‚

Hello!!! HellOoooooOoo…hello!! Everybody! How are you? Today, I got a lil time for myself..so I made some diy items.

My room is super duper dusty lately. I’d bought dust mite vacuum, but unfortunately the parcel was lost during shipping. I bought it again, and hoping it won’t lost again.

Because of my room sooo dusty, so I was thinking to cover up all my baskets. You really can’t see with your eyes the dust on fabric, but its there πŸ₯²

So I do some research on how to diy it by using recycle things I have now – boxes.

Things you need to make this lid are:

1. Scissor or cutter

2. Glue gun

3. Marker pen.

4. Ruler.

5. Big empty box.

6. Wrapper paper.

7. 10mm jute – optional

DIY basket’s lid πŸ˜ƒπŸ₯°

1. Make a measurement of the existing box. Well, u can measure using the ruler, but I prefer easier way. Just put the basket like this on the box, then line it πŸ˜‚

Cut the box, line it with pen.

2. Then, u make a straigh line with all points with thicker marker pen.

I make few points on the box, then straight it with ruler and thick marker pen.

3. Cut all the lines!! I cut it with blade first, then cut it with scissor because the box is soo thick πŸ˜€

Straight cut

4. After cut all the lines, I glue the lid with glue gun. U need to wait for quite some times before applying the glue, to ensure the glue is smooth, coz we want a smooth surface for the glue. Until, its liquid state, then only u apply it on the box. Or else, it will easily tearoff and not glue properly πŸ™‚

Cut the lines, and glue all the edges, make a rectangle lid.

5. Once u can see the lid shape, wrap all way with wrapping paper. I prefer use whatever I have now. U can do ur own creativity to decor your box.

Glue all the wrapping paper using glue gun 😁

6. I glue it all the way. At the both ends of the box, there are some extra paper. So I fold it and glue nicely.

Cut it then glue
Measure first and make some fold.
Then fold it into 2 like this..
And…fold like this…i glue the end and glue it all the way…hahaha. Im glue here…glue there..glue here..glue there and glue all the way…haha..gluing while singing the song!! πŸ˜‚

7. Tadaa!!! My box’s lid is DONE!!! Just a finish touch up to make it a smooth finished product, I glued jute rope at the edge of the box.

Glue gun all the wayyy…yeppie!!! πŸ˜†πŸ˜†πŸ₯°
Tadaaa!! Okay, u need a lot of patience when gluing this. U can’t do it fast, because it will smear or glue wont stick longer. U need to do it, slow and steady..then u will have a smooth nicely glued jute rope πŸ₯°

8. ALL DONE!!! 😍 My basket is a flexi material. I can bend it to fit the lid πŸ˜‚πŸ˜‚ Doesn’t fit? Just make it fit right there by force πŸ˜†

Jeng jeng!!! The finished product is here. Now dust can’t easily go into my things in that basket..hahahaha. Problem solved πŸ˜†

Till then…..to be continue…

Love, Sofia

How to wrap a simple, easy, cheap and unique birthday present – chocolate style

Hello everybody!!! Good Friday morning, everyone 😘

Sorry, was busy with some deployments job. Just want to share with you a simple, easy and unique present wrap that I made for my niece. Haha, yes….you heard it right!! I love something which is easy, beautiful, unique and also cheap. πŸ˜‚

So here u go, what you really need is…

1. Scissor

2. Glue

3. 2 plain color of paper

4. Cute ribbon or chocolate cover *optional

How to wrap a present – Cheap, Easy and Unique way (chocolate design)

1. Wrap the whole present like this, and put doible sided tape at the end of the paper. Make sure you fold it before put on the double sided tape.

Fold and put on double sided tape

2. Then, at both end of the present, just put in the glue inside, and keep it together like this..

Put in glue inside both ends
Tadaaa πŸ₯°

3. Cut the edge of both side, with zig-zag design..

Cut it zig-zag, u can refer below picture

4. Cut off another color of paper square, and simply glue on top of the present like this..

Zig-zag cut at end of present. Cut off another color of paper, and simply glue on top of the present..then you done!! πŸ₯°πŸ˜˜
Tadaaa!!! The end product will look something like this. You can put on the cover wrap chocolate paper, or ribbon for decoration ❀

That’s all for now, to be continue if i got any some other time..take care guys!!! 😘

Love, Sofia

Making a simple brownies πŸ˜˜

Hi everyone!! It’s been awhile I’m not baking. I had bought these brownies and chocolate bar for quite some time, just that I don’t have time to bake it.

Cooking chocolate, Brownies Mix and Cupcake πŸ˜ƒ
If you bought the ready made mix, it has the instruction at the back. I don’t want to buy any unwanted extra flour. So i bought this. Simple and easy. πŸ˜‚

How to make a simple brownies, but tasty πŸ₯°

1. Firstly, you pour all the mix into 1 BIG bowl like this. As u read the instruction, it need 85ml water, 50ml vegie oil and 1 egg. Just pour everything, then mix with spatula.
2. When u mix, make sure no lump. I don’t like any lump in my cakes/brownies, so I make it smooth possible. Not to use any electric machine, just use spatula and stir it with your hand. Simple and easy to clean πŸ˜ƒ
3. Chunk the chocolate bar. I don’t like sweet brownies, so i bought Dark Chocolate. If you likr sweet brownies, you can use the normal Milk Chocolate according to your taste bud πŸ˜‡
4. First layer, I pour the mix batter. Then I put the chocolate chunk like this on top. After that, I layer again with the mix batter.
5. So, it will looks something like this. Picture before heat it with 180 degree celsius, and about 23 minutes.
6. You will know your brownies are ready when the top is crack like this. The box instruction was to stick fork in it. If it’s not stick to the fork, so it’s ready. I just don’t, coz it will look hideous on my brownies πŸ˜‚ when i feel light, and just nice plus top is crack and dry, I stopped it.
7. Tadaaaa~~ its yummy!! πŸ₯° Top and bottom dry, and moist in between ❀

Okay, that’s all for today

To be continue…

Love, Sofia

Pssstt…psttt..when A Traveller on Budget starts packing her things…πŸ˜‚

HelloOoooOooooo Everybody!!!!

Ni hao ma?? Its a holiday week!! Whoot whoot!!! πŸ₯³πŸ₯³πŸ₯³

As you know, for Malaysian, we have yearly festival Chinese New Year on upcoming 1st and 2nd February. Then, following our replacement state holiday on 3rd February. So, it’s happened that…we…Malaysian who stayed in Kuala Lumpur going to have 3 days leave..straight from 1-3 February 2022. Whoot!! Whoot!! Wasn’t it awesome?? I love Malaysia coz we have a lot of festival and lots lots of leaaaveesss 😁

Soo, everyone. Since the pandemic still going on, and seems like will never go away, so we were mostly travelling within our states. On this weekend, we going to go “Sekinchan!!!”. So, I’m starting to pack light, coz we just going to stay for a night πŸ˜‚

Just want to share some trick and tips for a light and budget packing. For those who using contact lens, I’m pretty sure you got a lot lot of these right???!! Contact lens casing. When you buy the saline, you will probably get one. I have a lot, so I try to multipurpose the use of it.

I don’t have any allergic to plastic and kinda rough and tough skin, so I can use this way. For those who have a very sensitive skin, it is not advisable to store your skin care like this πŸ˜…

Okay, that’s all for now..tonight I’m going to pack my cloths..and just using my laptop backpack!! Hahaha!! I’m not a lazy traveller..I’m just a minimalist on budget πŸ˜ƒπŸ˜„πŸ˜†πŸ˜…

Till then….see you in next post…

To Be Continue…

Love, Sofia

The empty contact lens casing
Tadaa..Body Gel, Shampoo, Skin Care and Tooth paste πŸ˜„
I kept all inside a small plastic, sealed